
Doing mathematics in a pandemic - Part IV: Talks with OBS
This is the final post in a four-part series on adapting to the pandemic as a mathematician. See Part I – AlCoVE, Part II – Collaboration, and Part III - Teaching.
As conferences moved online, a number of different methods of giving a remote talk became commonplace. One was to simply point a webcam at a chalkboard and lecture as usual. Another is to make slides and use the “Share Screen” option on Zoom to show the slides to the audience. Another popular method, which I have used a number of times, is to make partial handwritten “slides” in Notability or GoodNotes on an iPad, with space left for doing examples and computations, and then share the iPad screen over Zoom and walk the audience through.
Today I’ll be explaining how to use Open Broadcasting Software (OBS) to give a talk from home in which your slides show up behind you as if you were standing next to a projector screen, but are nearly as crisp as if you were reading the PDF on your own computer screen. François Bergeron at UQAM first introduced me to this method, and his COVID-19 page features excellent explanations of how he creates his own virtual talks.
First, here is what the output of my first attempt at using OBS in a virtual talk looked like:
The above talk was given at the Enumerative Combinatorics session of the virtual Canadian Math Society winter meeting in 2020. Other videos from this session are available here, including another example using OBS by Marni Mishna.
There are two steps to getting this working: (1) setting up your video sources in OBS, and (2) feeding the video output to Zoom.
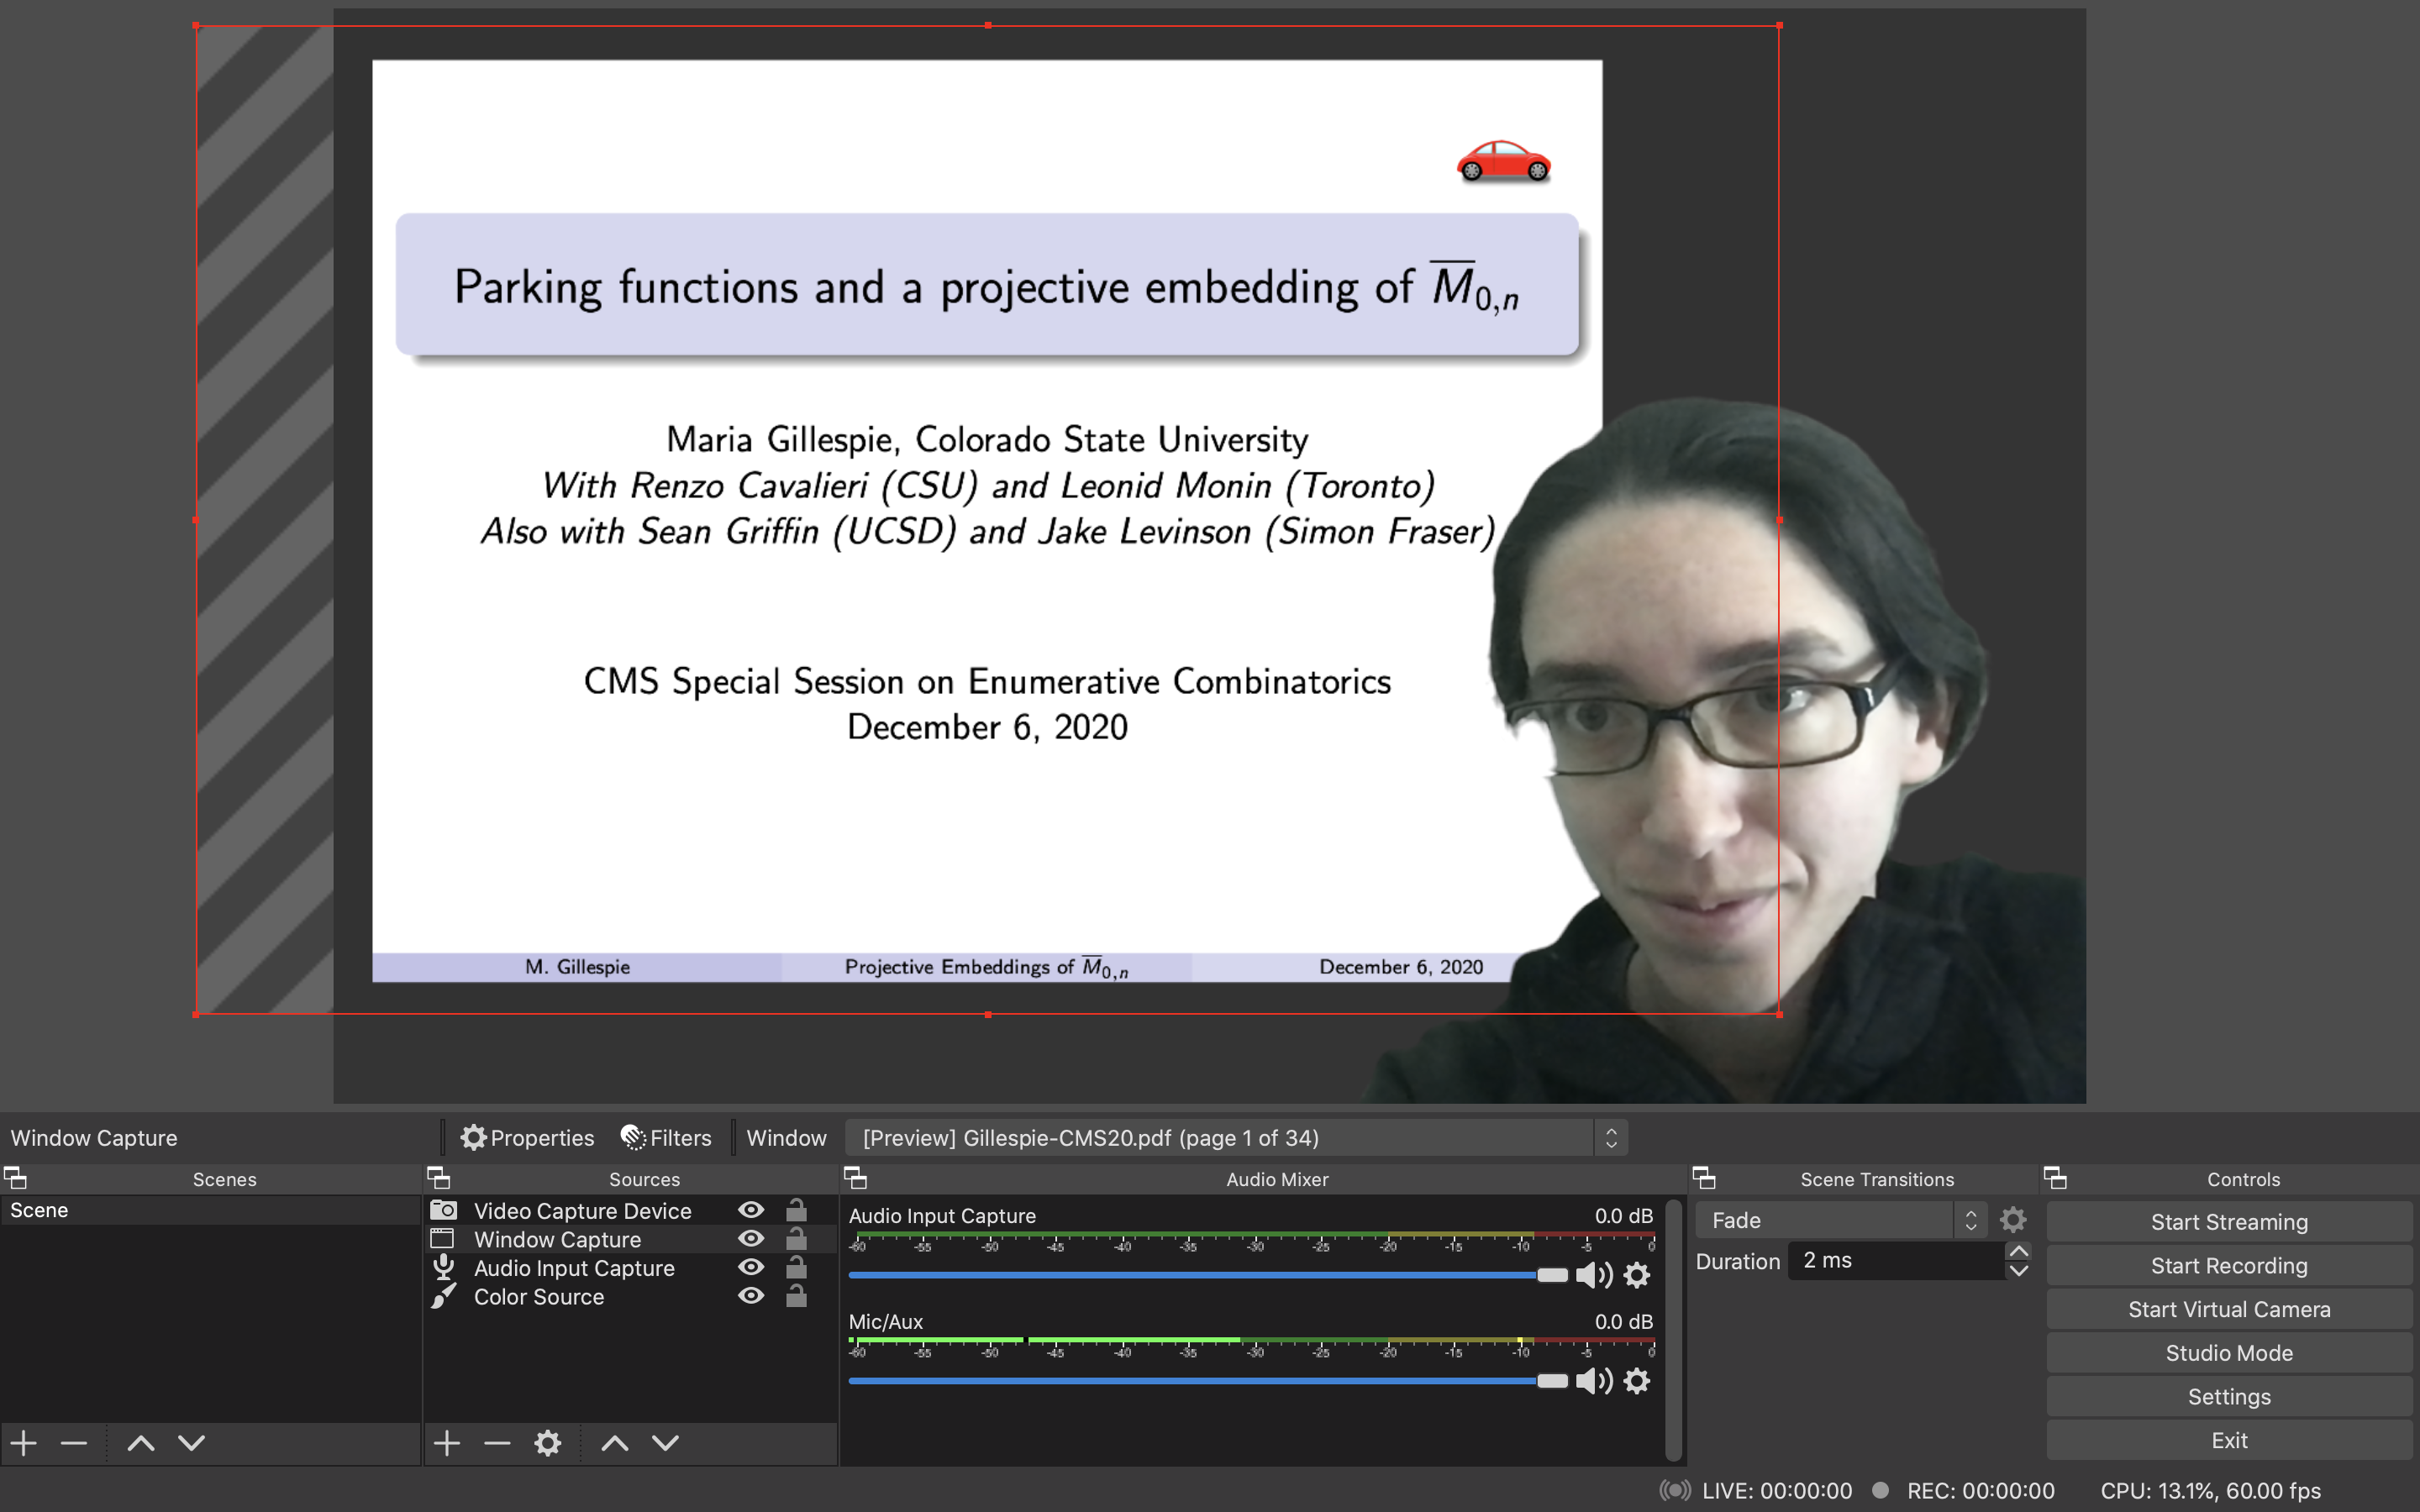
Step 1: Video sources in OBS
The first step is to install OBS from obsproject.com. Once you install and open it, you’ll see a window with a preview of what your video project looks like. At the bottom of the windows are various menus: Scenes, Sources, Audio Mixer, etc.
You’ll only need one Scene, and you’ll add various Sources to put together the Scene, using the + button at the bottom of the Sources box. Here were the Sources I used:
-
Color Source. This allows you to essentially set a “Background color” for your scene. It defaults to a dark grey. Once you add the color source, you can right click it and click “Properties” to change its color.
-
Window Capture. This is the source that you can use to make your slides appear. Create a Window Capture source, open your slides in your pdf viewer in another window, and then go back to OBS and right click on Window Capture to select Properties. There you can tell it to use the pdf viewer as the window that you’re capturing in this source. Finally, go back to the pdf viewer and go into presentation mode, so that you can flip through the presentation with a clicker or keyboard as you would in a real classroom.
Tip: If you’re on a Mac or another operating system that has multiple desktops, you may need to open your slides on the same desktop window as OBS is opened in for OBS to find the pdf viewer as a source. In particular, you need to feed it to Window Capture before going to full screen or presentation mode; otherwise OBS will not recognize it as a source.
-
Video Capture. This uses your laptop webcam or other webcam to capture your face. You can again right click to get to Properties to change the webcam you’re using if you wish. To filter out everything except your head, you want to use:
-
Chroma Key filter. Right click on the Video Capture source and go to “Filters”. Then click the + under the “Effect filters” box and click “Chroma Key”. You can then click on the Chroma Key filter to choose which color you want to filter out.
Since I had a green screen (see Part III), I filtered out the color of my green screen behind my head, and voila, the video capture source only showed the outline of my head and nothing else. If you don’t have a green screen, make sure you’re positioned in front of a blank wall and then just choose the color of that wall to filter out.
-
Finally, make sure you order the above sources in the Sources box so that Video Capture is highest up, then Window Capture is second, then Color Source is third. This way your head appears in front of the slides which appears in front of the background color.
I resized my Window Capture layer by dragging its outline in the OBS preview window so that it sat in the upper left of the screen, leaving room for my head on the right as if I were standing next to the projector screen.
Here is a screen shot of OBS after setting up everything as above (plus an audio input source - see Optional Step 3 below):
Step 2: Connecting OBS output to Zoom
For this step, you’ll need to install the OBS Virtual Camera plugin. It’s easy to install, and once you do, if you restart OBS there will now be a “Start Virtual Camera” option under the Tools menu.
If you click “Start Virtual Camera”, this creates a virtual camera device recognized by Zoom. Now, log into Zoom, start a meeting, and click on the up arrow next to the “Stop Video” (or “Start Video”) button. There should now be an option to select “OBS Virtual Camera” as your video camera in Zoom. Select it, and you should see your OBS creation being streamed over Zoom!
Now comes a tricky technical issue. Suppose you want to use a clicker to flip through your slides in presentation mode. Then you need your laptop monitor to be focused on the displayed slides so that the click registers as a slide advancement. But then that means that you can’t see OBS or Zoom on your laptop screen, so you can’t see yourself as you’re gesturing to things on the virtual screen, and can’t aim appropriately or make sure your head isn’t blocking the words.
To solve this, what I did was to log into Zoom on both my laptop and iPad, and position the iPad in front of my laptop webcam so that the webcam still captured my head, but so that I could see myself on the iPad while my clicker clicked through the slides on my laptop. There are other solutions as well; it should be possible to port the iPad screen itself into Window Capture in OBS as well, though I haven’t personally figured out how to do this. But as long as you have one screen to click through your slides and another to view yourself, you’re good to go.
At this point, you’re nearly ready. Zoom will capture your audio as normal, and displays your new video setup from OBS, so you can give your talk!
Optional Step 3: Audio via OBS
There was one minor issue when I practiced this setup: OBS does some processing which makes the video feed into Zoom lag behind the audio that is also being captured by Zoom. It was only about a half-second lag, and people who I practiced with said it was noticeable but not a major issue.
I did find a way to fix the lag issue, however, and that was to pipe the audio through OBS as well, so that OBS took in both audio and video inputs from me and output both in sync to Zoom. Here are the steps I took to do so:
- Create an Audio Source in OBS. Go to Sources again and add an Audio Input Capture source. You can go to its Properties to set it to capture whichever microphone you prefer (in my case, the lapel mic that I described in Part III).
- Install a Virtual Audio Cable. This will have to be third party software, as at the moment OBS does not have a virtual audio plugin that resembles its virtual camera feature. I installed VB-Audio Cable, which is a program that can take output audio from one software source (in our case, OBS) and “plug it in” as the input audio to another software (Zoom).
- Turn on audio monitoring in OBS. To do so, in the Audio Mixer box at the bottom of your OBS screen, click the Settings wheel next to the volume button on Audio Input Capture, and go to Advanced Audio Properties. Then in the Audio Monitoring column, set Audio Input Capture to “Monitor and Output”.
- Launch VB-Audio Cable. It needs to be running for the next steps to work. Besides this step, you don’t need to interact with the VB-Audio Cable program at all.
- Set OBS’s audio monitor to VB-Cable. Go to the main OBS menu at the top and click on Preferences. Click on the Audio tab, then scroll down to Advanced. There, set the Monitoring Device to VB-Cable.
- In your Zoom meeting, set your microphone to VB-Cable, which should appear as an option for your Zoom microphone now.
Now you’re all set! Time to go give that awesome virtual talk.
Please share your own tips for giving virtual talks in the comments below!